Category: Disney-Inspired Treats

“PLANES” Cookie Pops

Dusty cookie pops
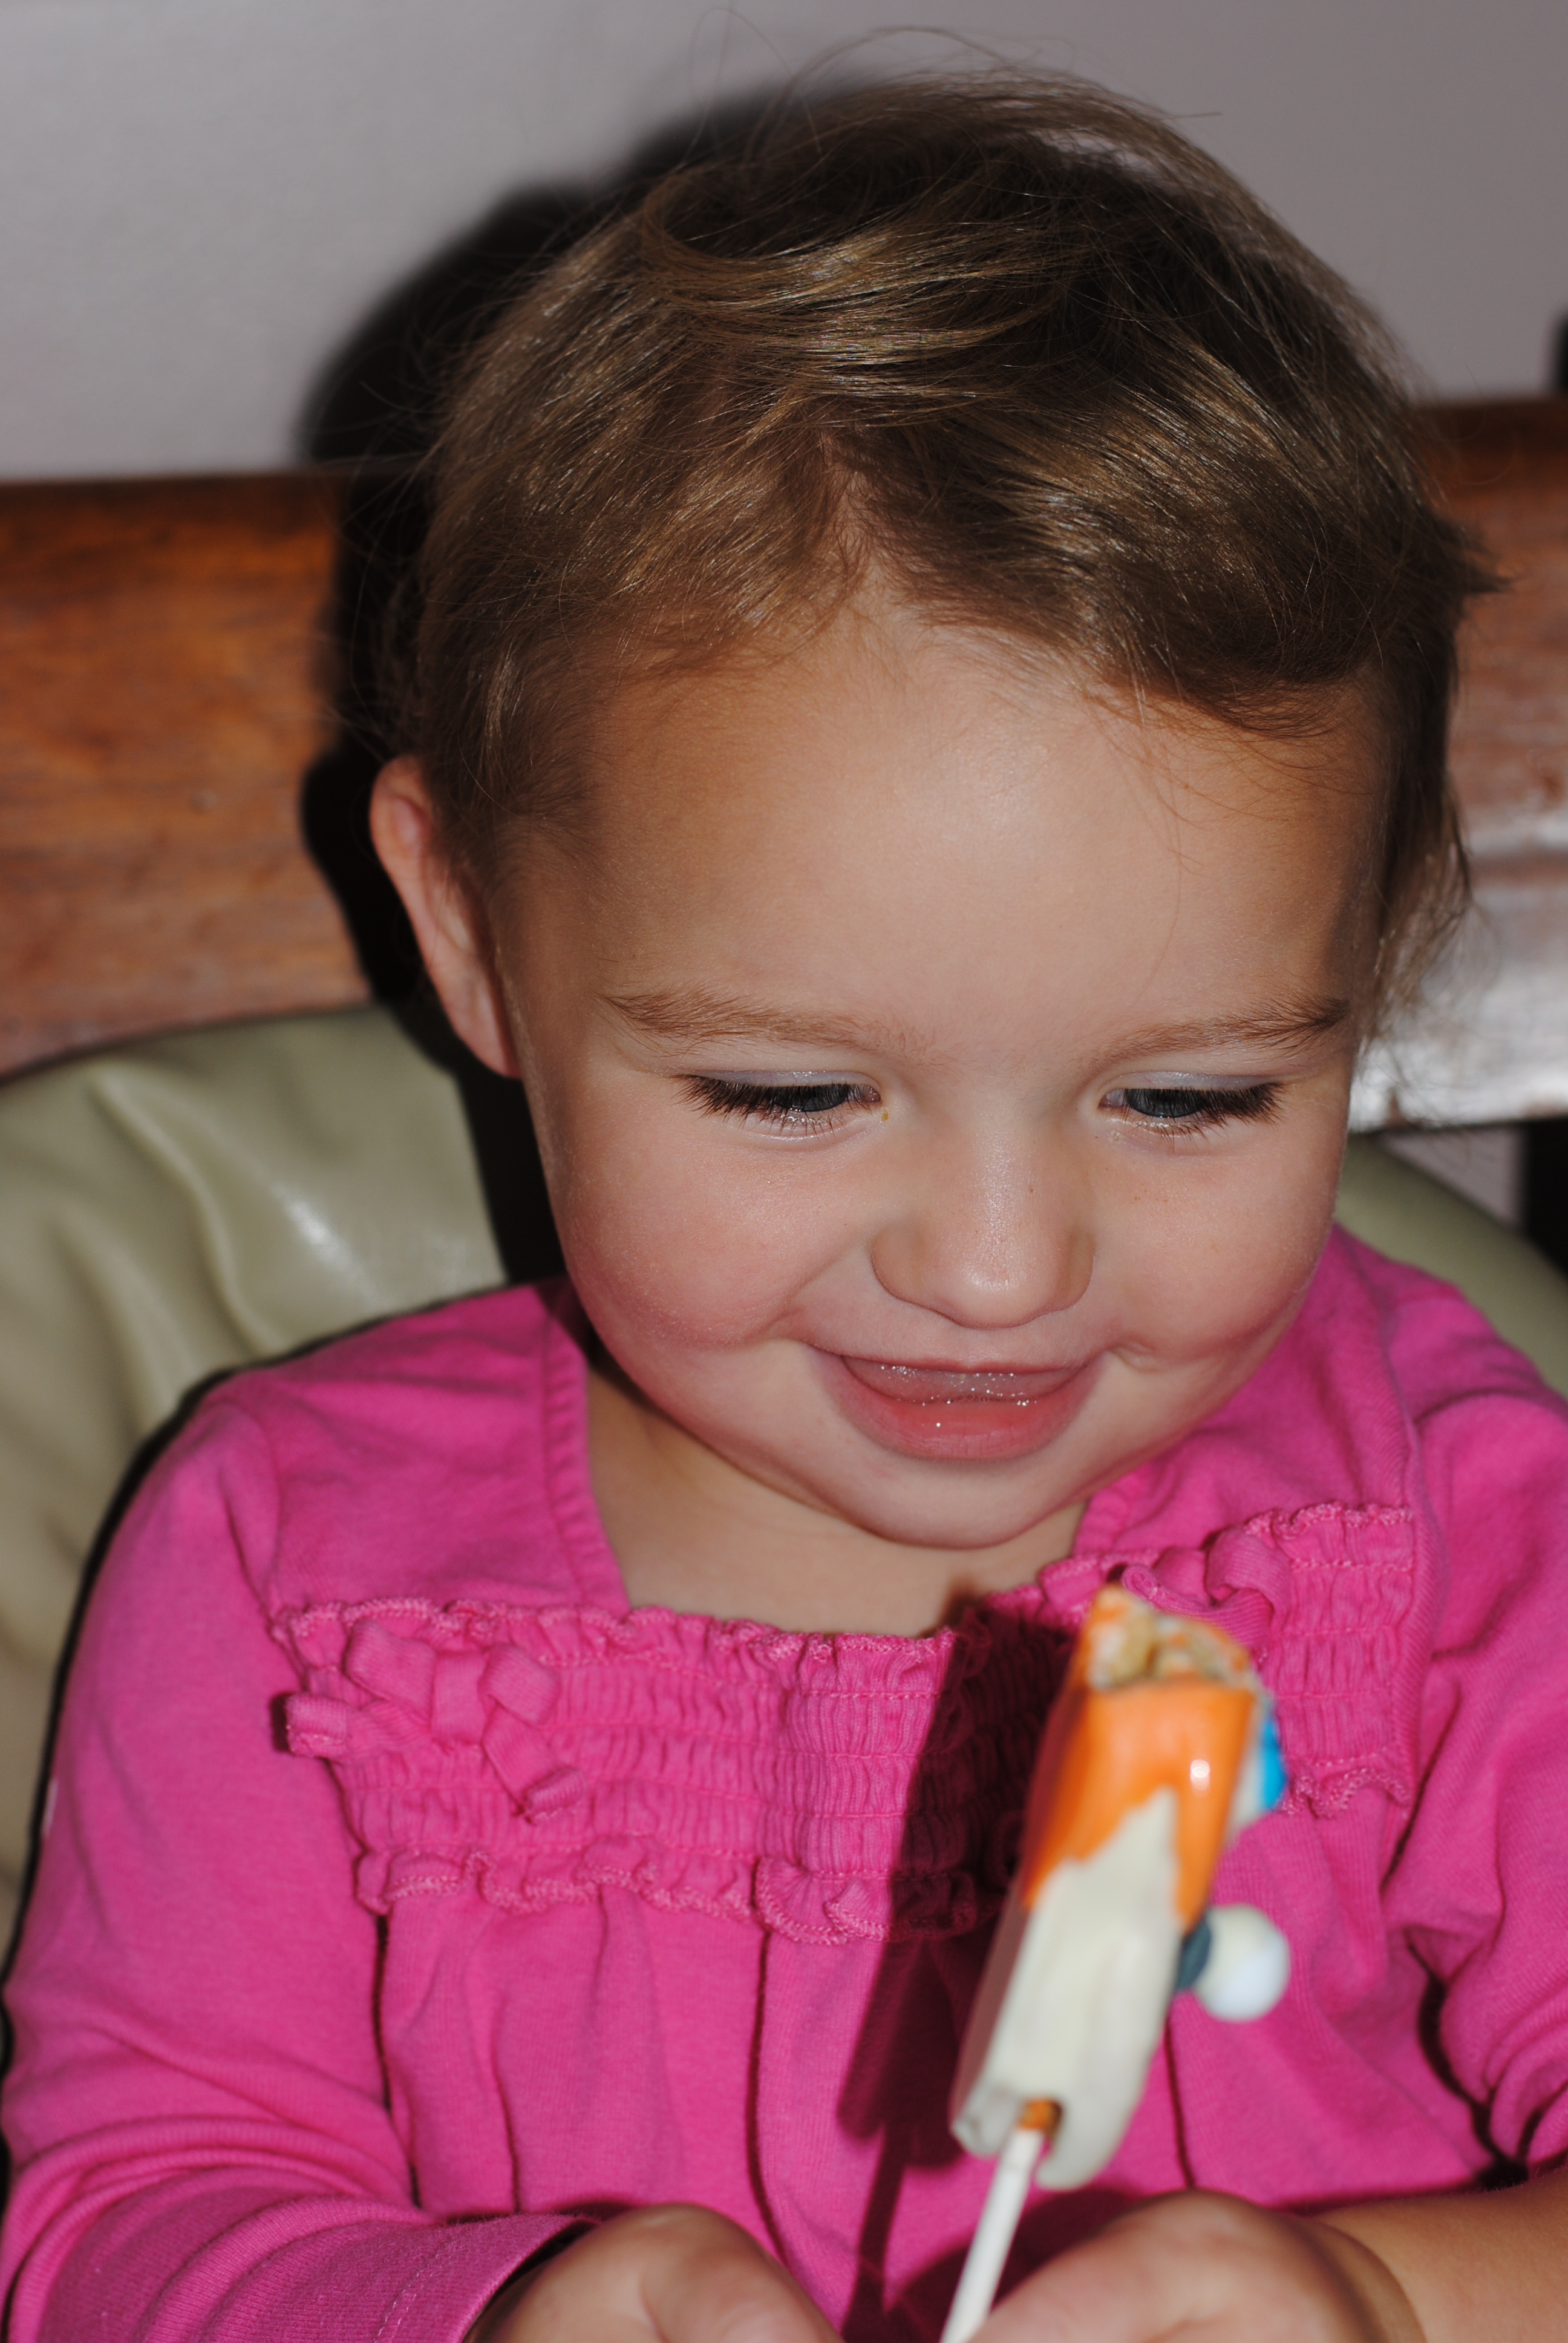
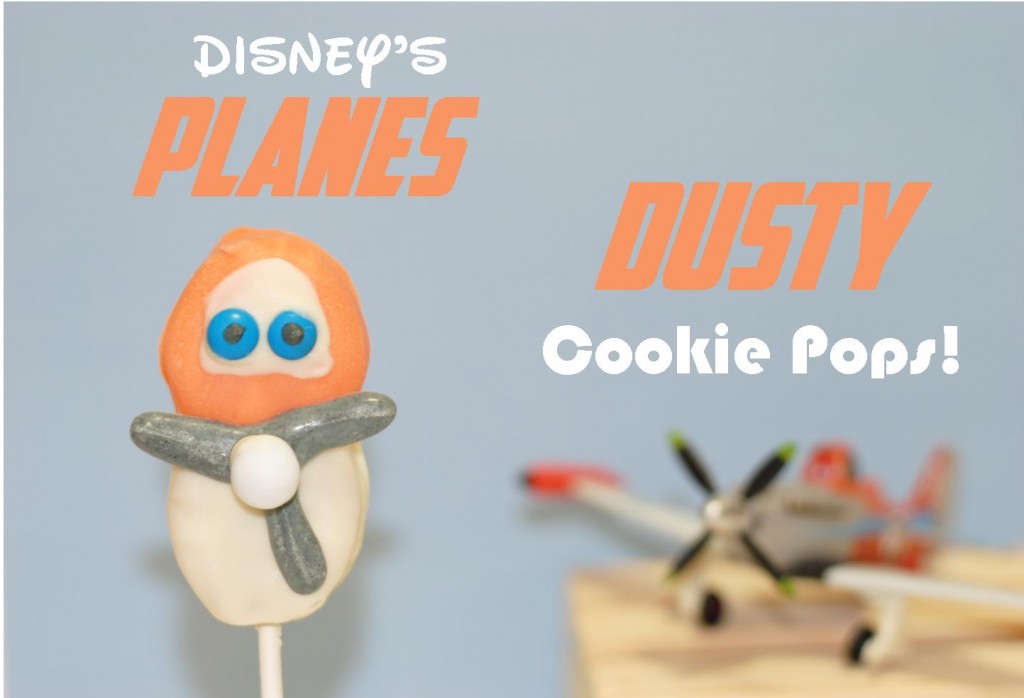
Chocolate Covered Nutter Butter Plane’s Inspired Dusty Cookie Pops!

I’m certain everyone knows by now that my household is pretty excited about this weekend’s premiere of Disney’s “Planes”.  So in celebration of the premiere this week we are having some High Flying Fun!  Last night, I decided to try to turn a Nutter Butter Cookie into the face and nose of Dusty the crop duster lead character of Planes.  Pictured above is my end result.  If you’d like to make a Cookie Pop Dusty, these are the steps that I took, including a few photos that I took along the way.

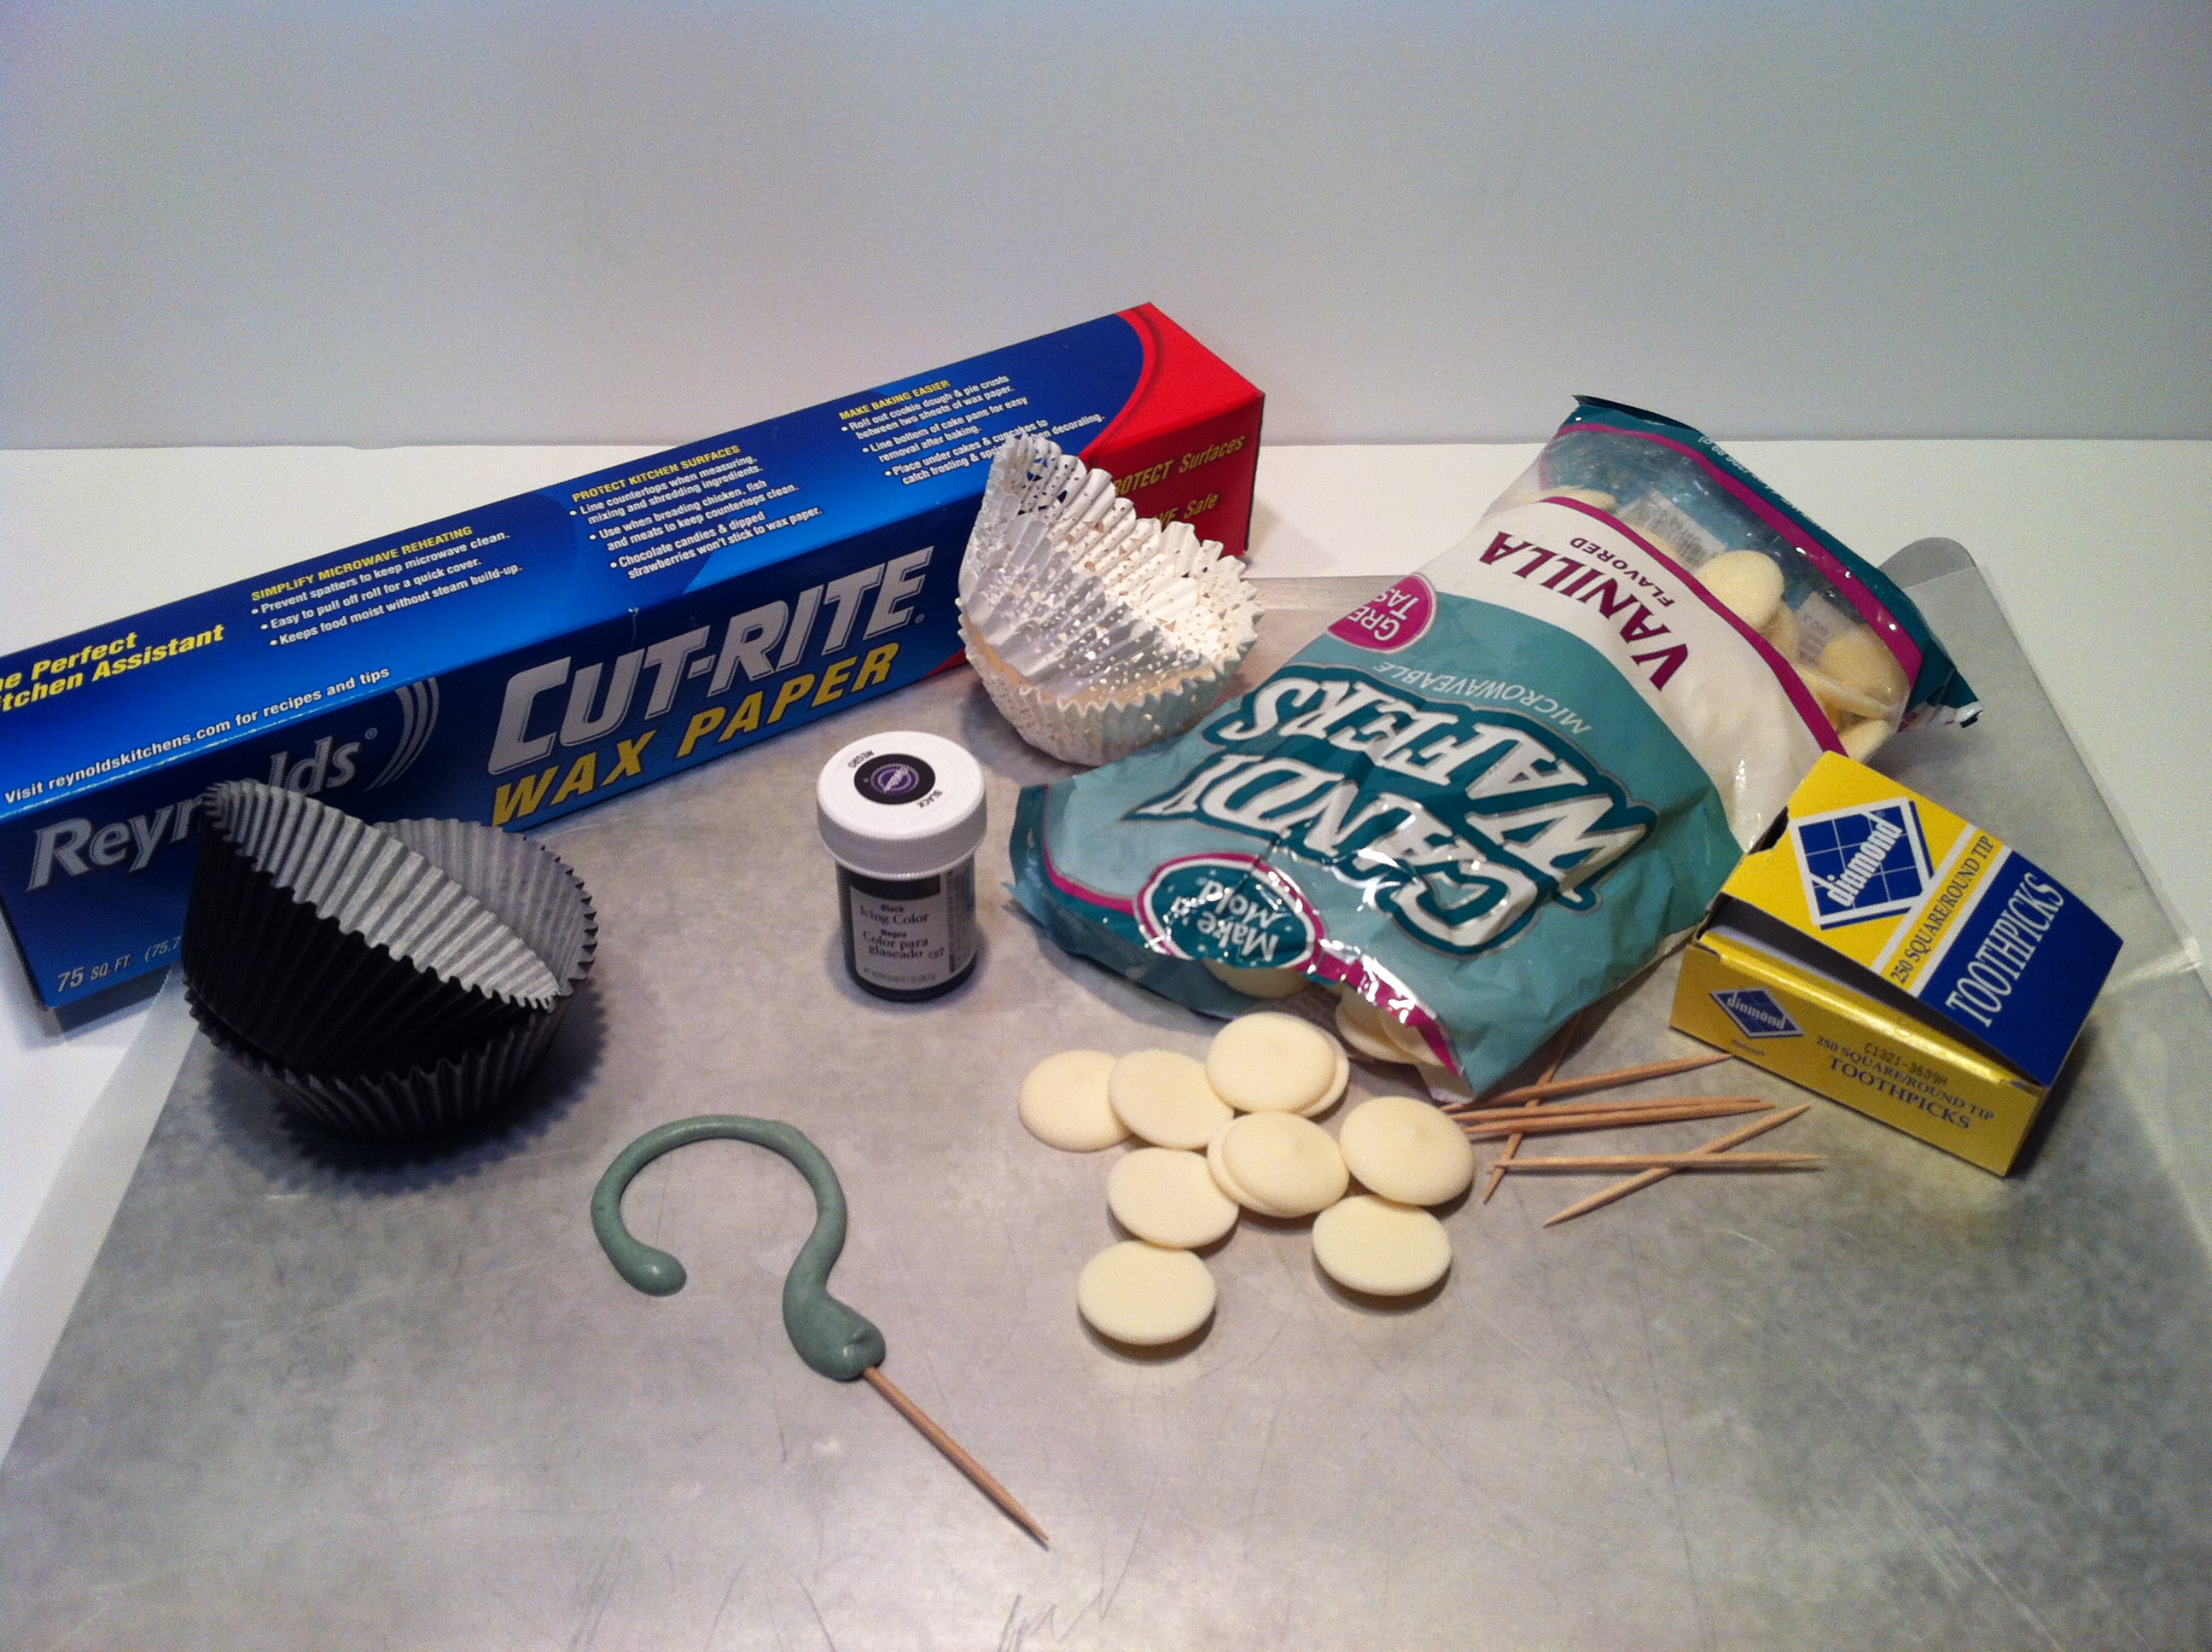
  1. Gather all your supplies.  I used white and orange chocolate melts, black icing coloring, plastic sandwich bags, scissors, a skewer, wax paper, pencil and one piece of paper, white Dutch mints, mini blue M&M’s, cookie pop sticks and Nutter Butter Cookies.
  2. There are two ways to make this cookie, with or without the cookie pop stick.  If you do not want your Dusty cookies on a stick, then skip this step.  If you would like to make the cookie pop version, then you’ll start by attaching the stick to the cookie.  To do this, gently separate the Nutter Butter cookie by sliding the two piece apart.  Then melt your chocolate wafers.  It doesn’t matter which color chocolate you use. Take your cookie stick and dip the top third of the stick within the melted chocolate.  Lay the dipped portion of the stick on top of the center of the opened cookie.  Gently put the cookie back together, with the stick in the center.  Place them in the refrigerator for five minutes.  This will allow the chocolate to harden around the cookie pop stick.
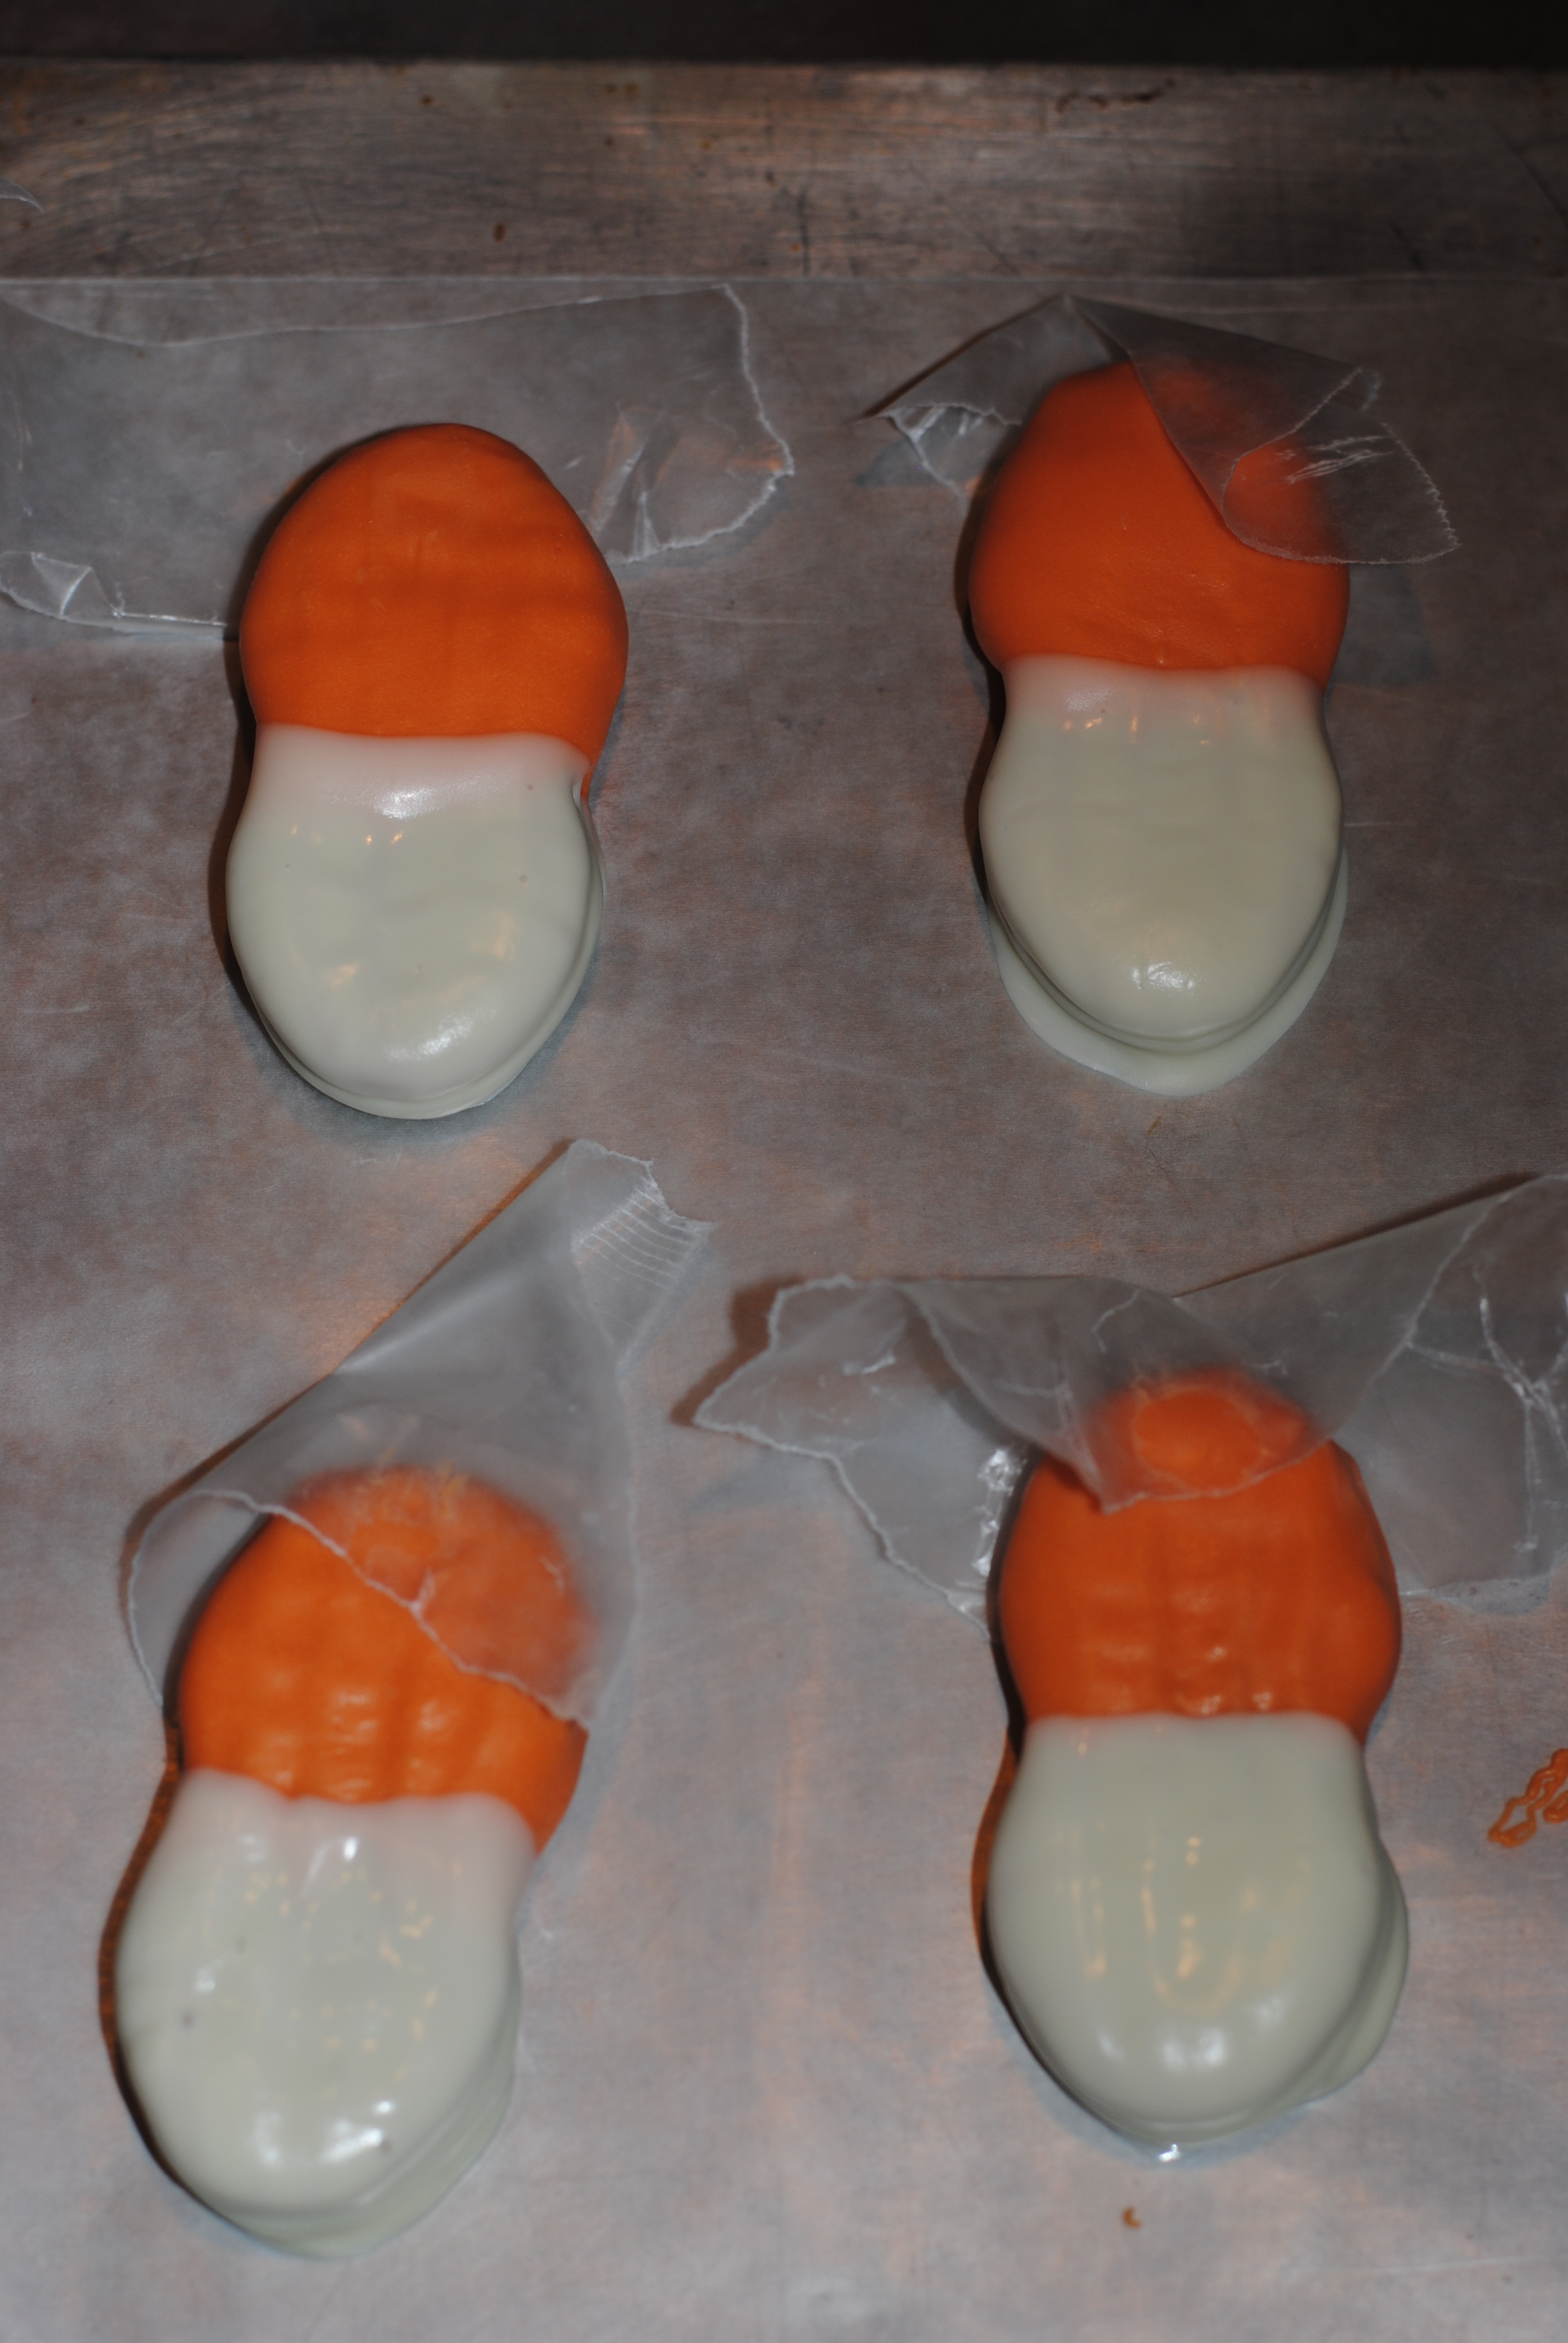
  3. For those of you that chose to skip the cookie pop stick this will be your first step.  Dip your Nutter Butters half way into the orange chocolate and lay them on top of a cookie sheet lined with wax paper.  If you’re making the cookie pop version, dunk the entire Nutter Butter in white chocolate first .  Then let them harden on the wax paper.Orange half dipped Nutterbutters
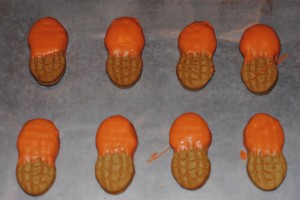
  4. Once the chocolate has hardened, move onto dipping the bottom half white.  Cookie Pop version, this is when you would dip the top in orange chocolate.  Below is a photo of how your cookies should look.DSC_2178
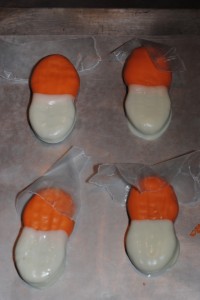
  5. Next, dip your skewer in the white chocolate and draw Dusty’s white face directly in the middle of the orange part of your cookie.  Allow this to dry for a couple of minutes.
  6. Take two mini M&M’s and place them on the bottom of white face that you drew.
  7. Now to make the propellers!   On a piece of paper, draw your propellers. FYI- Dusty has three blades.  Place the drawing in between your wax paper and your cookie sheet.  You’re going to use this drawing as a guide for making the propellers in chocolate.  At this point, you’ll most likely have to melt your white chocolate again.  After melting, I scooped the chocolate into a sandwich bag and added a touch of black icing coloring.  Work the black dye into the white chocolate by kneading the bag between your fingers.  This will turn it into a silver color.  Cut a small snip out of a bottom corner of the bag and start piping the propellers.  After making the blades, add a Dutch mint to the top.  You might have to dip the mint in additional chocolate to make it stick.  Move the paper along as a guide for each propeller. Let them dry for at least five minutes before moving to the next step.
  8.   Add a small dab to the bottom of the propeller and place it in the center where the orange and white chocolate touch.  Make sure you don’t block Dusty’s eyes.
  9. Let the entire cookie set for a few minutes  You’re done!

DSC_2191Victoria enjoyed few bites!

These cookie pops are perfect for a Planes party or a special treat!  I do want to caution you that these cookies are very sweet. Shortly after this photo was taken, Victoria shared the rest of the cookie with others. It’s a little too much chocolate for a two-year old aviator.  As you can see, she enjoyed it!

Mickey and Minnie Mouse Flower and Garden Birthday Party

Table DecorYou Might Be Wondering How This Theme Came To Be.

My nephew and my daughter’s birthdays are only two days apart.  So when my sister-in-law, Karen Enke Wheeler suggested we throw a dual birthday party for my daughter’s 1st birthday and her son’s 2nd birthday, we instantly knew it had to be a Minnie and Mickey themed party.  Mickey and Minnie birthday parties are super popular, so we thought we’d give it a twist.  Both of our children love the outdoors and we knew from visiting Mickey’s home in Magic Kingdom that Mickey loves to garden and Minnie loves flowers.  That’s how our idea of a Mickey and Minnie’s Flower and Garden Party was born.  Today I’d love to share with you some of the unique items that we created for the party and some of the themed food that we served.

IMG_2324Since this was a party for both of our immediate and extended friends and families, we knew that we were going to have guests attending the party that didn’t know where to park.  I created this Party Parking sign out of wood, spray painted it and then used vinyl lettering to complete it.

Birthday MouseketeersThese two signs, featuring the birthday girl and boy’s names, were also made from wood.  I wanted to make sure that even if it rained the signs would withstand the weather.  The Minnie sign has a separate bow, which I glued on.  To do the lettering, I found the font style on-line, printed out how Walt Disney might have written their names and used it as a guide to paint their names on the signs.

Guest SeatingHere is a photo of our guests’ seating area.  The day was a bit windy, so the balloons were a challenge.  Unfortunately, all of the polka-dotted red and white balloons blew away during party set up.  With my daughter walking through the area the tables looks like Minnie Mouse put on the finishing touches.  Each pail, used to hold the balloons down, has a name of a little party guest painted on it.  They were filled part way with dirt for the children to use later during the children’s flower-pot activity.

Kids Table

The kids table featured tons of polka dots.  All the boys’ place settings were red and white for our pal, Mickey and pink and white for the little girls’ spots representing Miss Minnie Mouse.  Karen and I purchased the terra-cotta pots at a local craft store and painted them.  Inside of the pots we gave each child a Minnie or Mickey magic towel that they could use to clean up their hands after they were done planting their flower.  The garden markers that they used to write their names on, I found in Target’s dollar section.  The small gift, a Mickey Mouse vinylmation, was a surprise for them to take home.

No Sew Flowers as Favors for the Ladies

When hosting a birthday party I like to have thank you favors for the adults who attend the party too.  I made these “No Sew” Minnie Mouse Inspired Flowers which were from Victoria and given to her guests.

Rice Crispie MickeyKaren made these adorable Mickey Mouse chocolate dipped Rice Krispie treats for my nephew to give his guests.

  gift tagsHere is a close up of the gift tags that I made for the Rice Krispie Treats.  Once again I used my trusty Mickey Mouse punch.  LOVE that thing!

Serving Table The following photos will show you some of the food offerings that we had for the party guests.  We kept it really simple, as most of our little guests preferred to play in the yard with the oversized balls, that polka dotted the lawn, than eat food. In addition to the items that are featured here, we had Pluto’s Hot Diggity Dogs, Pete’s Pizza and Daisy’s Drink Station, to name a few.

Minnie's Flower Pot SurpriseMinnie’s Flower Pot Surprise was yummy Dirt Cake!

IMG_2350IMG_2331    Toodles Noodles   IMG_2362

Last But Not Least The Birthday Cakes and Cupcakes!

Thank you Fairy Godmother Kerri for such a beautiful birthday cake!


My nephew's adorable Mickey Mouse birthday cake with Mickey inspired cupcakes made by Karen.
My nephew’s adorable Mickey Mouse birthday cake with Mickey inspired cupcakes made by Karen.

Karen and I had a wonderful time creating this party for our little Mouseketeers.  I’d like to thank Tia Maiolatesi Welsh for taking the beautiful photos that I shared with you today!


Pirate Picnic Party Supplies

Golden Cookies

Gold Doubloon Cookies, Check.  Captain Hook Cupcakes, Check….

I’m just about ready for tomorrow’s Pirate Picnic!  It’s going to be a big surprise for Gavin and Victoria when they wake to find their special Pirate Picnic Invite.  I can hardly wait!  I thought I’d share some of the items that I’ve prepared for the day.  They are really simple things that you could do to theme your children’s picnic lunch too.

The Treasure MapPicnic treasure map

Above is the portion of the picnic treasure map that I very easily and quickly made using Publisher.  I simply searched Publisher’s clip art file for images of the main features of  my parent’s back yard.  Obviously these images are not exact replicas of what my six-year-old sees at his Grandparents house, but he will understand the map very easily as the clip art images are recognizable.  Then I printed the map on regular printer paper and glued the 8.5″ x 11″ map to a piece of oversized construction paper.  I used two Pirate stampers to create a fun border around the map.  Rolled it up, put some red ribbon around it and it’s ready to go.  I’ll be using the same clip art images as the “clues” that Gavin and Victoria will find as they complete the steps listed on their invitation.  After finding six images, Gavin will have to guess as to where the Treasure Map is located.  Once he sees the garden or the pool image, I’m certain he will know that the map is at Grandma and Papa’s house.

Pirate Party SuppliesThe Treasure Map and Pirate Flag Straws are packed and ready for the picnic, now on to the Feast!

The Pirates’ Feast will include:

  • Fish Sandwiches (Peanut Butter sandwiches cut into the shape of a fish using a cookie cutter)
  • Canon Balls ( Red Grapes)
  • Pirate Swords (carrot sticks)
  • Gold Doubloons (sugar cookies sprinkled with bright yellow sugar)
  • Captain Hook’s Cupcakes (Check out Monday’s post to find out how to make these cupcakes.)
  • White Skim Milk with Pirate Flag straws

Can’t wait to share tomorrow’s photos with you all!


Captain Hook Cupcakes

pirate picnicAhoy Mate!  Ye invited to a Pirate Picnic!

I’m so excited to start this week!  At the beginning of summer break, the kids and I sat down with the summer calendar and a sheet of paper.  On that paper we wrote everything we wanted to do before summer was over.  One item that was a weekly “must do” was a picnic.  Amazingly enough due to schedule changes, summer vacation is more than half way over and we haven’t had a single picnic yet!  I decided this week we’d check off this summer wish list item with a bit of pixie dust.  We shall have a Pirate Picnic!

Both of my children, ages 2 and 6 years of age, are HUGE Pirates fans.  Gavin, the six-year-old, likes Peter Pan and the Pirates of the Caribbean franchise and Victoria, the two-year old, loves Jake and the Neverland Pirates from Disney Junior. This should be a boat load of fun planning and I’m happy to share the stops along the way with you.

Here’s the Pirate Picnic Day Plan:

  • Gavin and Victoria will wake in the morning to find their official Pirate Picnic Invite.
  • Gavin, assisted by his little sister, will have to check off a list of tasks to located the  clues as to where to find the Pirate Picnic Map’s location.  The kids will collect Gold Doubloons along the way as they complete the tasks, which will be items that Gavin usually does to get his weekly allowance.
  • After finding all the “clues”, the kids will be able to guess the location of the map, which will be at his Grandparents house.
  • Once we arrive at their Grandparent’s house, Grandma and Papa will give them the map to the picnic’s location.
  • The Pirate Picnic will be set up in the yard, where Gavin and his sister will find a pirate themed feast of yummy treasures.  One of the treasure treats will be the Captain Hook cupcakes that are pictured above.

Throughout the week I’ll share with you other items that I have prepared for this Pirating day, in hopes that you might be able to use them to create your own Pirate Picnic!    To get you started, check out Disney Junior’s site for Pirate Party printable items, like Gold Doubloons.  They have a bunch of ready to print items that I plan to use for the picnic.  Here’s the link: http://disney.go.com/disneyjunior/parties/birthday-party-ideas/jake-and-the-never-land-pirates-birthday-1825356

Hook To make my Captain Hook inspired cupcakes that are pictured above, you’ll need the following items, which are pictured: white chocolate melts, black food coloring, toothpicks, wax paper, and a cookie sheet to make Captain Hook’s hook.  Simply draw your hook on a piece of white paper and slide it between a layer of wax paper and your cookie sheet.  Then take your melted white chocolate and add a small amount of black food coloring to turn it silver.  Once the chocolate is ready, use your paper drawing as a template to make the hook, slide a tooth pick in the bottom of the hook and if need be, add a dab of chocolate on top of the toothpick to secure.  Chill in the refrigerator while you make Hook’s cuff.

hook cupcake sleeveTo make Hook’s cuff you will need red card stock, glue gun and a doily.  Wilton makes a baking cup kit called Black Doily that I found really easy to use for this project.  The kit comes with the black and white baking cups shown in the supply photo above.  I used the black cup to bake the cupcakes in and the white doily I used as the trim to his red cuff.  I took a picture of them close up so you can see that I cut the base of cup out and cut slits into the doily every inch. This made it easier to glue the doily to the card stock.  I used a little over one doily cup per cupcake.

Last but not least, ice your cupcake with black icing, place the cupcake in Captain Hook’s cuff and gently push the toothpick hook in the center of the cupcake.  Now we are both well on our way to a feast fit for a Pirate!

Have you partied with Pirates before?  I’d love for you to share any Pirate Party photos with Mouse Ears Mom and I’ll share as many as possible on our Facebook page.

Mickey Mouse “Premium” Healthy Bar

Mickey's Watermelon BarMouse Ears Mom’s Healthy Twist on a Walt Disney World Treat Favorite

If you’ve ever traveled to The Walt Disney World Resort then you know that the “Mickey Premium Ice Cream Bar” is a classic treat.  Within moments of the stepping foot on property, I am quickly discarding the evil nutritional fact wrapper and chopping off one of those precious chocolate covered ice cream ears!  At that wonderful moment the family vacation has officially begun.    But unfortunately, vacations end and once you leave Walt Disney World, the magical bars stay behind.  This is probably a good thing for my waistline.

Using my family’s favorite summer fruit, I decided to pay homage to the “Worlds” most classic ice cream ears by recreating them with a healthy twist.  Super easy to make, you and your kids could be enjoying Watermelon ears this evening!  All you need is a watermelon, a Mickey Mouse cookie cutter, and some cookie pop sticks.  After cutting the watermelon, place it on a cookie sheet lined with wax paper, then insert a cookie pop stick, and freeze on the cookie sheet.  I also chose to place each pop in a freezer bag.  I used the cookie cutter that is pictured to the right.  It can be purchased on Disney Store’s website or at Disney’s Parks.

My two-year old, Victoria, LOVES popsicles.  The juicier the pop, the better is her motto.  Since the watermelon was frozen, she spent some time sucking the juice out of this pop!

Victoria enjoying her Mickey pop

As you can see by the photo, Victoria absolutely enjoyed this fruit version of Mickey’s ears!