Category: Free Printables

Mickey and Minnie Mouse Inspired St. Patrick’s Day Craft

Mickey and Minnie Mouse St Patty Craft

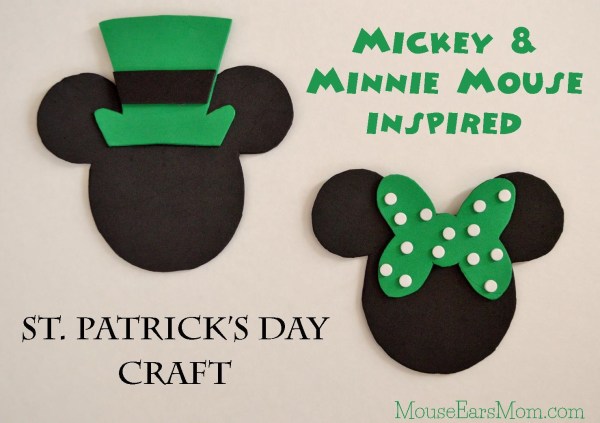
 Looking for a simple St. Patrick’s Day themed craft to make with your little Mouseketeer?

This week I made these Mickey and Minnie Mouse inspired over-sized magnets with a great group of 1st and 2nd grade students. The kids proudly constructed their projects in just over a half hour and I’m thrilled to report that their was little clean up left behind! With the use of glue dots and adhesive-backed foam, there were no sticky tables, fingers or clothing!

Today I’ll share with you the simple craft tutorial, including a list of supplies and a printable template for you to use with your children.

Craft Supplies

Supplies:

  • One 8 1/2″ x 11″ sheet of black craft foam (This will be enough for two sets of Mickey and Minnie magnets.)
  • One 8 1/2″ x 11″ sheet of green craft foam (You’ll only us about a quarter of this sheet.)
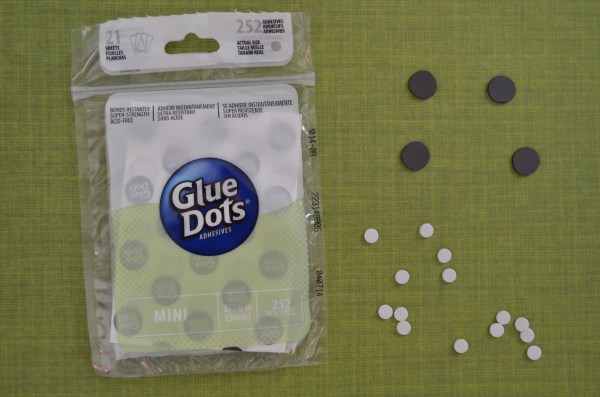
  • One sheet of adhesive-backed white craft foam (the smallest size sheet you can find will work)
  • Glue Dots Adhesives (I purchased the above package for the class to use and each child used one sheet to make the two magnets.)
  • Hole Punch
  • Four 1/2″ self adhesive round magnets (two for each mouse)
  • Template ~ Here’s a PDF of the template I made for the kids to use.  It was drawn quickly by an unsteady hand, so no judging people.

 St. Patrick’s Mickey and Minnie Template

  • Scissors
  • Pencil

Tutorial

Mickey Mouse St. Patricks craft template

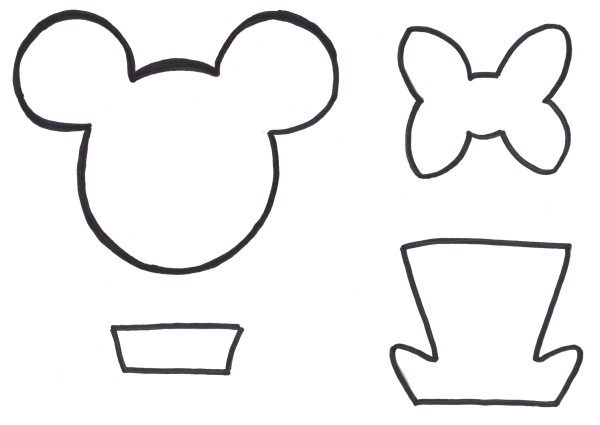
  1. Print out the template on card stock.
  2. Cut the four images out
  3. On the black foam, trace the rectangular image once and the Mickey image twice, then cut them out.
  4. On the green foam, trace the bow and hat image and cut them out.
  5. Using a standard hole punch, punch approximately 15 pieces of the white foam.
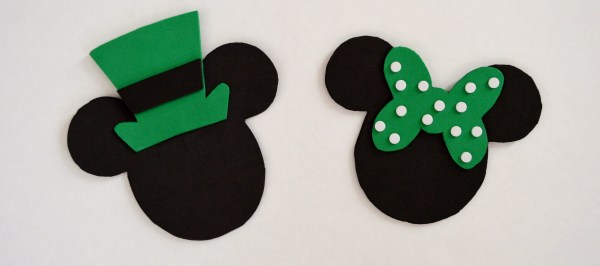
  6. To create the Mickey inspired magnet, attach the hat onto the Mickey by using a few of the glue dots.
  7. Add the black rectangular piece to the green hat with two glue dots.
  8. To create the Minnie inspired magnet, stick the fifteen white foam punches onto the green bow simply by peeling the backing off of the white foam.  Don’t you love self adhesive!
  9. Secure Minnie’s bow onto her black foam head with the use of a few glue dots.
  10. Flip Mickey and Minnie over and add a magnet to each ear. Again, just peel the paper off and stick them to the foam.

That’s it! Throw away the peeled away paper and you’re done cleaning up!

Mickey and Minnie St. Patrick's Day Craft

Happy St. Patrick’s Day!

Flying High with a Pizza Pie Planes Party! {Free Printable Menu Cards & More}

Planes Pizza Party

Are you going to see Disney Planes Fire & Rescue this weekend?  We’ll be there!

To say my son, Gavin loves airplanes, would be an understatement.  There isn’t a day that goes by when discussing planes or something that flies isn’t part of our conversation and aviation is a staple in almost every play activity.  This seven-year-old boy goes through flying toys as if he’s changing clothing.  It’s not because he doesn’t take care of his toys, he wears them out or the plane gets stuck in a tree.  With the movie release of Disney Planes last year (see my review here), Gavin’s love of airplanes unbelievably grew and he immediately started asking when Planes Fire & Rescue would be in the theater.  Well, the movie release week has finally arrived!

To celebrate this exciting event I put together a couple “Free Printable” Planes-inspired items that I created and party planning tips to help you host a Pre-Show “Flying High with a Pizza Pie” Planes Party for your little aviators and their friends!

 Planes Themed Pizza!

planes pizza menu

There are so many different types of pizza that you can have at a pizza party!  Try offering the kids specialty pizza and place these silly menu cards close by.  It’ll give young readers a chuckle or two before choosing their pizza.

  • Chicken Wing-man Pizza
  • Chicken & Broccoli Alfredo Flying Pizza
  • Ham & Cheesy Flight Attendants Pizza
  • Pepperoni Pie In The Sky Pizza
  • Flying High Cheese Pizza Pie

I’ve created this set of FREE printable pizza party menu cards for you to use. (For Personal Use Only)  Simply print the Planes Pizza Party file (found below) on white card stock, cut the orange and blue colored cards out and fold along the white line.

Click on the Planes “Pizza Party Menu Cards” link for the five piece printable menu cards.

Planes Pizza Party Menu Cards

Dessert!

Planes cupcakesI made these Planes-inspired cupcakes for my son’s birthday party last year.  Check out the super simple cloud icing tutorial for these soaring cupcakes here!

Dusty cookie popsAnother Planes-inspired dessert option are these Dusty Cookie Pops.  You can see my simple tutorial here!

Decor! {Free Printable Template}

Now that you’ve got the food covered, time to decorate the food table! Add a simple planes garland to the front of your food table, to complete your pizza party table.

Airplane Garland template

You can download the airplane template here!

 Trace the template on orange and blue card stock for the airplanes to match the menu cards.  Then add blue and orange table wear and your party will be soaring!

Still looking for more Planes party ideas?

Check out my son’s planes-themed birthday party here!

Check In Desk (Presents!)

Now you’re ready to have the perfect Pre-show Planes-inspired Pizza Party!  Enjoy your party and then off to show!

Donald Duck Cupcakes

Donald Duck birthday blog hop

Happy Birthday Donald Duck!

Today, I’m so excited to be participating in a Birthday Blog Hop for my favorite hot-headed feathered friend.  Let’s get this party started with some Donald Duck inspired cupcakes!

Donald Duck cupcakes

 Are you ready to start celebrating?  Here’s a photo tutorial on how to make these super simple Donald Duck inspired cupcakes, including a printable hat template.

Since Donald has white feathers, I chose to make white cake cupcakes.  After baking and cooling, I iced them in a simple swirl formation by starting on the outside of the cupcake and making my way to the center.  After one swirl, I made a second swirl on top to give it height.

Donald Duck cupcake 020At this point (pun intended), my son walked into the room and said, “Cool Mommy, you made Donald Duck butts!”

I have to admit, I agreed with him.  They do look like Donald’s butt.  If you’d like to celebrate Donald’s birthday today and you’re pressed for time, then I’m certain you’ll get a chuckle or two from your kids when you present them with Donald Duck butts after school today.

However, if you’d like to make the cupcakes I featured at the beginning of this post, let’s continue to the next step.

Donald Duck cupcake 002

Print out this Donald Duck template below and trace it on a piece of blue card-stock.  You’ll need two hats for each cupcake.

Donald Duck Hat Template

Donald Duck cupcake 003

Hot glue a toothpick and a piece of black ribbon to each hat.

Donald Duck cupcake 005

Add a second Donald hat on top with another dab or two of hot glue.

Donald Duck cupcake 009


Donald’s hat is now complete and it’s time to move onto his bow-tie.

Using red candy melts in a squeeze bottle, pipe bow-ties on wax paper.  To keep my ties consistent, I drew a bow-tie on a piece of paper and used it as a template under the wax paper to trace with chocolate.  Allow the chocolate to fully dry before placing them on your iced cupcakes.

Donald Duck cupcake bowties

Isn’t he such a dapper duck?

Donald Duck cupcake

Happy Birthday Donald!

Don’t let the party stop here!  Visit the other blogs on this Donald Duck Birthday Blog Hop for more fun!

Picnicking With Mickey Cupcakes

Picnic mickey

Are you planning a family picnic this Memorial Day Weekend? Add a little Disney magic to a simple cupcake by adding these easy-to-make Mickey Mouse chocolates.

Mickey chocolates

To make these chocolates you’ll need chocolate candy melts, wax paper, a microwave safe squeeze bottle or microwave safe disposable decorating bags and my Mickey Mouse template.

Below is the template that I created with the use of a Mickey Mouse craft punch.  Print it out to get started!

Mickey Mouse chocolates template

Mickey chocolates 010

Using the template underneath a sheet of wax paper makes creating Mickey Mouse candies a breeze.  Simply melt the chocolate in the squeeze bottle or in your decorating bag, snip a small hole at the end and then cover the blue Mickey heads with chocolate. Once the chocolate has cooled, flip them over and your miniature Mickeys are ready to magically transform your cupcakes!

One important tip to make your candies fabulous ~ do not try to trace the Mickey head to create the candy.  This will give the candies bubbles on the back side, instead of the smooth finish you see on the candies pictured on the blue plate.  Instead, apply chocolate in the center of the large circle until it fills the entire circle.  Follow with adding the ears by applying chocolate again in the center of one ear until it fills the ear and then complete Mickey by adding his last ear.  Talk about easy!

Mickey chocolates 023

Have a Magical Monday everyone!


From the Kitchen of The Swedish Chef {DIY Free Printable}

The Swedish Chef favor tagsThe birthday weekend is finally here!

My son, Gavin’s birthday party is tomorrow.  Today I’ll spend the day preparing for his big day. Last night I put together these little tags for the candy favors that will go inside the Muppet tote bags his guests will be receiving.  One of Gavin’s favorite candies is Swedish Fish (yum).  I have to admit, he gets his sweet tooth from his Mommy.  Anyways, I thought I would be perfect if these special fishes came from The Swedish Chef.  He is Swedish, you know.

The little bags came out cute and I’d love to give each and every one of you a bag, in honor of Gavin’s 7th birthday.  However, the shipping fees would kill my bank account, so I thought I’d share the file for the tags instead.  I think the tags would be a perfect accessory for “Muppets Most Wanted” movie night treat or if you plan on throwing a Muppets themed party too!  I found the image of The Swedish Chef on Wikipedia and it’s most likely a copyrighted image.  These little tags are not for sale and are only being used for my son’s party.  Having said that, here’s the PDF file for your personal use:

 The Swedish Chef

Here’s how to put the tags together.

 Print the page out on a piece of 8 1/2″ x 11″ white card stock.

The PDF file has two rows, one with The Swedish Chef’s images and the other with the “FROM THE KITCHEN OF THE SWEDISH CHEF” text.  Cut both the Chef’s image and the text out in a square that measures 1 1/2″ x 1 1/2″ .

Glue the two sides together back to back or what I did was insert a 1 3/4″ x 1 3/4″  piece of a brown or blue card stock between the top and bottom and then I glued it all together.

Hole punch it, add the string and your ready to go.

Now for me to get back to the kitchen. Have a great weekend!  “BORK BORK BORK!”

The Swedish Chef snack bag tags