Category: Disney-Inspired Crafts

Celebrating Friendship with Winnie the Pooh

pooh allDuring this time of Thanksgiving, I give thanks for friendship!

Disney films teach our children the value of friendship and how important it is in life to be a good friend.  I believe some of the best examples can be found tucked within the relationships in the Hundred Acre Wood.  That “Silly Old Bear”, debuted on this 6th day of November back in 1924 in a poem titled “Teddy Bear” by A.A. Milne.

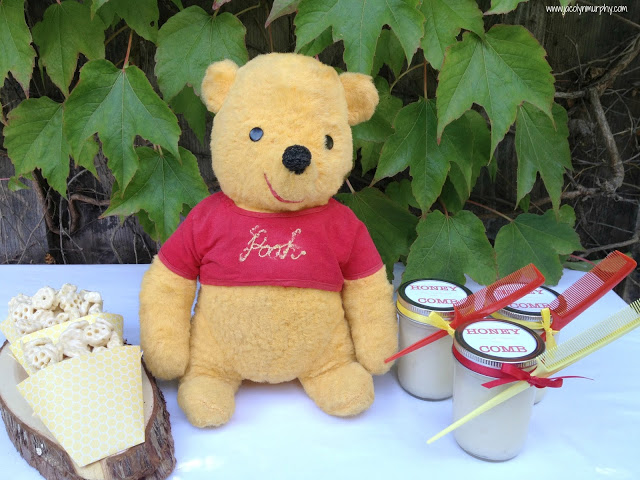
In honor of Winnie the Pooh and friendship, today I’d like to introduce you to a Disney friend that I made when I happened upon her blog post, Teen Pooh Bear Party.  Her name is Alexis and she is the author of the blog Jac O’ lyn Murphy.  Alexis is so incredibly talented and reading one of her blog posts is like Pooh having “a smackerel of honey”, just one smackerel isn’t enough!

At Jac O’ lyn Murphy’s adorable movie viewing party of The Many Adventures of Winnie the Pooh,  Alexis provided yummy honey treats for her teen daughter and her friends to enjoy. pooh treats alone 
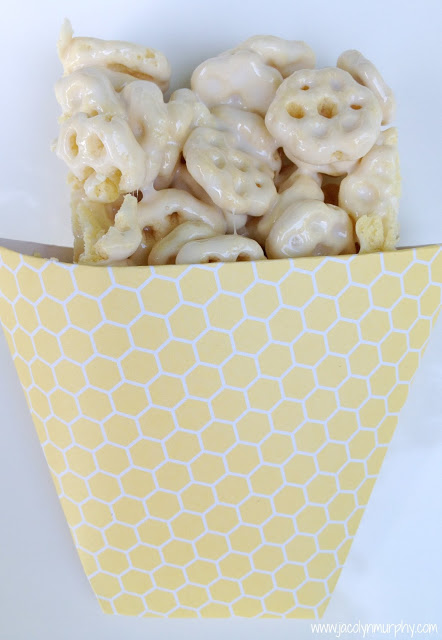
Don’t they look so yummy?  Alexis provides a step by step tutorial on how to make them, complete with beautiful pictures!

Below is a photo of the girl’s party favors.  Don’t you just wish you were invited?  No worries, on her blog Alexis gives you the tutorial, again complete with photos, on how to make the deep conditioner.

pooh comb all

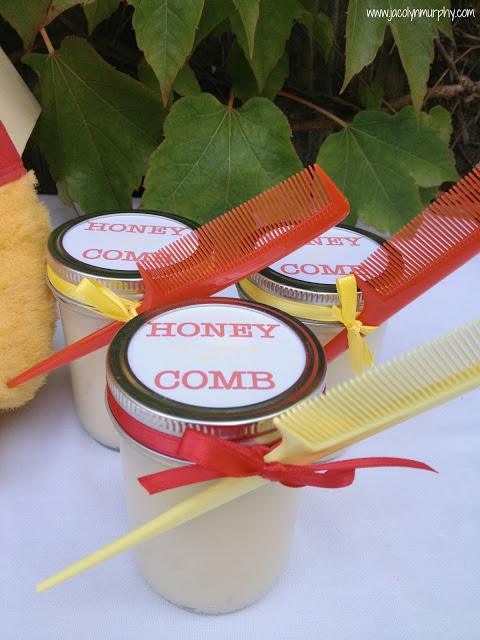
Click on the link below to visit Jac o’ lyn Murphy’s blog for her tutorial on how to make the Honeycomb treats and the Honey deep hair conditioner with a Comb.

Click here: http://www.jacolynmurphy.com/2013/08/even-big-girls-love-winnie-pooh-our.html

Thank you for stopping by the blog today.  I’m truly thankful for all my Disney friends!  And to that silly old bear, “Happy Birthday Pooh!”

Happy HallowSCREAM Favor Tag {Free Printable}

 Happy Halloween favor tag

Happy Halloween Everyone!

Today is a short post that may come in handy this week.   After my little “monsters” and I finished putting together Gavin’s classmates’ Monsters University-Inspired goody bags, I thought I’d create a simple tag for the back side of the bag. If you’re preparing your children’s classmates goody bags today, you may be able to use this tag too!   They are a basic white tag with a little eyeball in the center.  The tag simply states, “Happy HallowSCREAM”.   These tags could be used on any trick-or-treat goody bags!  I used Avery brand 2 1/2″ diameter glossy white round labels to print out the tags.  Using a sticker to apply the note was so easy!  If you’d prefer to use white cardstock, punch the tags out using a 2 1/2″ round craft punch and glue it on the back side of the bag, so easy!  Just make sure your little Monster remembers to sign them!

To use these tags, click on the Adobe pdf file below.

Happy Hallowscream printable

If you newly discovered Mouse Ears Mom, you might have missed my post of what’s inside the Mike inspired gift bag and an easy tutorial on how I made them.  Check out the post here:

http://www.mouseearsmom.com/2013/10/15/classmate-halloween-gift-idea/


Have a Monstrous Halloween!

Classmate Halloween Gift Idea

Mike bagMonsters University Favorite, Mike Wazowski makes a perfect Monstrous goody bag.Roba's 2013 092Put these little goodies in the Mike bag and little monsters will be screaming happy.

This year for my son’s 1st grade classmates,  I wanted to make a Halloween treat that wasn’t super scary, could be for a girl or a boy and it had to be easy to make since there are 19 little “Monsters” in his class.  I made this little treat bag in less than 10 minutes and the goodies were staring at me with one big eye.

If you’d like to make your child’s classmates this one-eyed monster bag, here’s what you’ll need: white, black and blue scrapbook paper, a 3″ hole punch, a 1″ hole punch, a dime, glue stick, everyday hole puncher, twine, scissors, and lime green paper sacks.  I found these treat bags at Michael’s Craft Store.  They were only $3 for a bag of 12. The bag dimensions are 4.7″ x 2.8″ x 8.9″. Mike Goody Bag Supplies

Start the project by using hole punches.

You will need a 3″ punch in white and a 1″ punch in blue.  I didn’t have the right size hole punch for the black of his eye. I used a dime as a template. Trace the dime on the black paper and cut it out.

Mike's EyeThen glue Mike’s eye together.

EyeGlue the eye to the middle of the bag.

Glue Eye

Fold back the top of the bag.

Goody Bag FoldHole punch the corners of the top through the fold.

Roba's 2013 090

Open your bag up and fill it with Monster treats.

I chose to stay true to my one-eyed friend and purchased Monster University Juicy Juice Apple Juice Boxes and Monsters University themed Kellogg’s Fruit Snacks.  In one part of the Monsters University movie the monsters were afraid of spiky balls.  I found these mini spiky balls at Target.  They come six in a pack for $1.  The matching pencil in Mike’s lime green color was also from Target’s Halloween section, $3 for a pack of 24.

After adding all your treats, the final step is to tie each side with the twine.  I knotted each side on the back and cut the ends short.

I hope my son’s 1st grade class of little Monsters enjoy!


Disney Crafting: Chore Reward Sticks

DSC_0012One of my favorite things about Disney Blogging is meeting many other people with the same passion for Disney.

For example, one fantastic site that I came across is www.loveourdisney.com .  I’ve learned from reading Becca’s blog, that she LOVES Disneyland and has fantastic tips for saving money to get there! I instantly became a follower of her blog so I could start preparing for my family’s 2014 trip to Disneyland.  Love Our Disney also has some super cute Disney Inspired craft ideas too.  One of her ideas I decided to make with my son.  It was a simple and quick craft to do with a six-year-old, so he was completely focused.  In addition, he’s now extremely excited to do tasks around the house…for Disney “Savings” of course.

Today I’d like to share with you Love Our Disney’s Craft Idea: Disney Chore Bucket.  Just click on the link below.  It will take you straight to the tutorial including “how to” photos.

http://www.loveourdisney.com/2012/07/craft-time-disney-chore-bucket.html

Of course, after your little Mousketeer has saved his millions, he’ll need a place to keep it.  If you’ve already made him a Personalized Souvenir Savings Suitcase, then he’s set.  If not, you might want to check out this tutorial, which I posted last Friday.

 Disney Saving Suitcasehttp://www.mouseearsmom.com/2013/09/13/how-to-personalize-a-disney-souvenir-saving-suitcase/

We are currently half way through our 3 weeks of Disney Vacation Planning Tips, Crafts, and Pre Vacation Parties.  Have you noticed that I’m saving the party ideas for next week? You have to be prepared for the vacation before the partying starts.

Here’s the scheduled line up for the next week and a half:  Tips to help your little one prepare for his first plane flight, some insight at my first hand experience with Disney’s Magic Bands’ test phase and pre-vacation party time week!

Hope everyone is enjoying these weeks as much as I am!

Using the Monorail to Countdown to Your Walt Disney World Vacation {Free Printable}

Countdown to disney on monorailMy little Mousketeers LOVE the Monorail.  As the Magical Express Bus takes us from the airport to our resort, my children yell “Monorail!” as soon as they see one from the window of our bus.  Upon seeing the monorail, our vacation has officially started.  So, this year when planning our trip to Walt Disney World, I created a Countdown to Disney that included the monorail.  My six-year-old and two-year old helped me set it up and let me say, you would have sworn we were setting up the monorail under our Christmas tree.  Both kids were so excited!

If you’d like to do this project with your children, it’s a lot of fun.  I put it all together for you as a Free Printable!  All you’ll need is white cardstock, a pencil to trace, scissor to cut our your monorail beams, a hole puncher, ribbon, Velcro spots, and maybe a few pieces of tape. Also, you need space to hang it!   I think it would be perfect in a child’s room.  Our home is a Cape Cod style so the kids’ rooms have slanted walls. I ended up turning our dining room wall into a monorail station for a month.  Thank goodness I have an understanding husband that puts up with all of my Disney crafting!

To get started, print out the monorail and monorail beam templates.

Click here for the template:  Monorail Countdown

1. Cut out the Monorail beam templates.

2. Alternating track styles, trace and cut out one beam per day of your countdown.  Then number each accordingly.

3. Hole punch the ends of the beams.

4. Connect the beams by stringing ribbon through the hole punches.

5. Cut out the monorail.  I laminated it too, since we would be using it for a month.

6. Adhere Velcro onto the back of the Monorail and onto each of the beams.

7. Print out the castle to place at the end of your track!

Click here for the castle printout: Cinderella castle

I didn’t create the Cinderella Castle artwork and would love to give the artist credit.  However, I found the image listed as free clip art, with no additional information.

If you and your kids love the monorail like we do, then I hope you and your family take a moment to make a Monorail Countdown for your family’s next Walt Disney World Vacation!