Category: Disney-Inspired Crafts

DIY: Winnie-the-Pooh Inspired HUNNY Pot Cupcakes

Hunnyt Pot Cupcakes

 Today’s National Winnie-the-Pooh Day!

On January 18th, in the year 1882, A.A. Milne, the creator of our beloved “Silly Old Bear” was born. Across The United States, we honor his birthday as a celebration of his most cherished character, Winnie-the-Pooh.

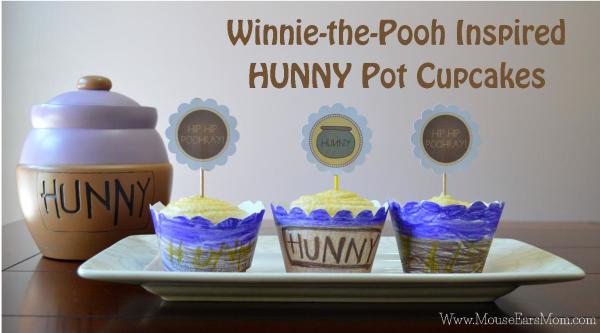
Is there a better way to do that than with a “Smackeral” of HUNNY Pot Cupcakes?

This weekend the kids and I are watching a few of our favorite Winnie-the-Pooh movies (Pooh’s Heffalump Movie is my personal favorite!) and celebrating his birthday with not just any old piece of cake. Victoria and I baked Honey Cupcakes with Honey Cream Cheese Frosting!  Sounds yummy, doesn’t it? The recipe is by Lauren Kapeluck and can be found on The Cake Blog.com.  Here’s a link to take you directly to her recipe for both the cupcakes and the frosting!

Honey Cupcake Recipe

With any good party, you need to have a fun activity! The kids and I made “HUNNY” pot cupcake wrappers to give the special treats a proper presentation.

I came up with the idea to make them with Victoria (my 3 years old daughter) while her big brother, Gavin (7 years old) was at school.  I was thrilled when he came home, saw what we were doing and wanted to make a few cupcake wrappers too! Being a “big” school boy now, I wasn’t sure how our latest theme for family weekend movie night would go over. Surprisingly, he enjoyed it as much as his baby sister!

www.mouseearsmom.com

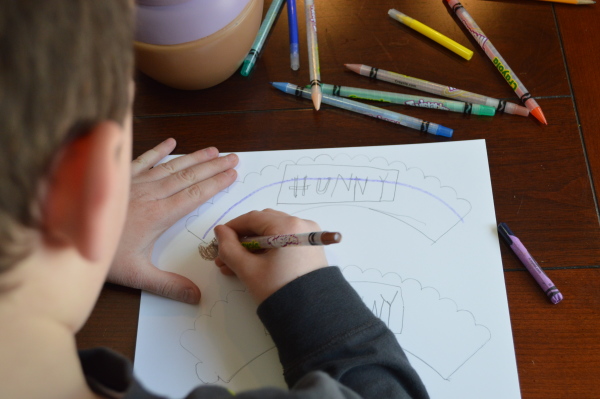
 Here’s a template for you to design your own “HUNNY” pot cupcake wrappers with your children!

blank cupcake wrap template

Cupcake Toppers

Stacy, the author of the Fancy Shanty blog, created the adorable cupcake toppers we used on top of our cupcakes.  She has a full line of free Winnie-the-Pooh party printables that are PERFECT for any Pooh Bear party!  Visit her blog to check out the adorable movie tickets, banners, cupcake toppers and honey pots!  Here’s the link to her printables:

Fancy Shanty’s Pooh Printables

Hunny Pot Cupcakes

Before you run off to start baking your own honey cupcakes and planning an adventurous day full of smackerals and such, I’ll leave you with a bit of wisdom from our friend, Pooh.

“When you go after honey with a balloon, the great thing is not to let the bees know you’re coming.” – Winnie the Pooh

Happy National Winnie-the-Pooh Day Everyone!

DIY: Celebrating a Disney-Inspired Valentine’s Day


Mickey and Minnie Mouse Valentine Boxes

During this past Christmas season my kids loved counting down to Santa’s big arrival using various advent calendars.  They quickly hopped out of bed each morning and the opening of doors, boxes and pulling little plush characters from pockets began. But now it’s over and depressing January is upon us.  Victoria has resorted to asking me daily when Santa will be returning.  So to combat the January blahs, I made these Mickey and Minnie Mouse Inspired Valentines Boxes to use each day as we celebrate the days counting up to Valentine’s Day.

Yay! Valentine’s Day is only one month away!

The idea is that each day the kids leave a special note to each other each night for the first two weeks in February and Mommy and Daddy leave them each a small Disney surprise inside their boxes. Last weekend, I shopped at Dollar Tree store and found a ton of great Disney branded items, including Valentines! Here are a few of the things I found. I was thrilled to find all of the Frozen-branded, Princess-branded and even Star Wars-branded items!

Dollar Tree Disney Finds

Every one of these items fits nicely in the kids’ surprise boxes too!

If you’d like to join in on the fun and make your own Mickey and Minnie Mouse Valentine boxes, here’s how I made them.

Supplies

 Supplies for Mickey:

  • “Celebrate It” brand mail box (Or any red box that has a lid you can cut a slot in.)
  • 2 sheets of black card stock
  • 2 heart stickers (Part of a bag of stickers that included the small hearts used for the Minnie Mouse box. I purchased the sticker bag for $1 at Dollar Tree.)
  • Glue Gun
  • Scissors

DIY Disney Inspired Valentine Box

  1. Since the box I chose to use was already red, all I had to do was wrap the lid in black card stock.  To make sure that the wrap was tight, I used a hot glue to keep the card stock in place.
  2. Next to make Mickey and Minnie inspired ears, all you have to do is trace the top of an average drinking glass, but flatten the bottom of the ears by adding a little flap to fold over. Wanting to make sure they stay put, I hot glued them onto the top of the box. (See photo below.)
  3. Add the stickers and you’re done!

www.mouseearsmom.com


I’m hoping the kids will enjoy this daily celebration of our family’s love for each other.  I’m certain the kids will enjoy the daily Disney treats but personally I’m looking forward to reading Gavin’s kind hand-written “nice” notes to his baby sister and Victoria’s “surprise” valentines to her big brother. Victoria has started making her Valentine’s already!

www.mouseearsmom.com


Have you started celebrating Valentine’s Day yet?

Simple and Inexpensive Frozen-Inspired Olaf Ornament Tutorial

Olaf Ornament

I found the cutest little Disney’s Frozen tissue boxes at our local Dollar Tree store. I can honestly tell you that I was shocked to find ANYTHING Frozen branded that cost only one dollar bill! Of course, I snatched up six boxes! The artwork is so adorable that I decided to re-purpose a now empty box to make today’s super simple ornament!

Dollar Store Olaf Ornament Tutorial

Here are the supplies that I used to make the Olaf ornament:

  • Tacky Glue
  • Sprinklets (or any glitter you’d like)
  • Small wooden frame (I found these 3″ x 3″ frames for 29 cents on clearance at a local craft store.)
  • Disney Frozen Tissue Box (Dollar Tree store is where I found mine!)
  • Bakers Twine
  • OPTIONAL: Spray Adhesive

Tutorial

  1. To make this ornament, pick up an Olaf tissue box from your local Dollar Tree store and cut off one side of the box.
  2. Brush the Tacky Glue on the front of the unfinished frame. (I used Tacky Glue because it dries clear, so it’s not as easy to see the Boo-Boos.)
  3. Dump that glitter on!
  4. OPTIONAL: Once the glitter dried, I sprayed the frame with Spray Adhesive and then allowed it to dry again. This step helps the glitter stay put!
  5. Cut the Olaf artwork out of the side panel just slightly larger than the frame’s opening.
  6. Glue the panel on the back of the frame and allow to dry.
  7. Add your twine for hanging purposes.

www.mouseearsmom.com

 If you can’t locate any Frozen tissue boxes, you can use wrapping paper!

I found this great wrapping paper at Hallmark!  Speaking of Hallmark, I’m certain you’ve seen the beautiful Disney Frozen ornaments that they had for purchase this holiday season.  Our local stores are completely sold out!  This ornament is a great alternative if your store is sold out or if you’ve already purchased a gift and didn’t want to spend an additional $15 per ornament.

Frozen ornament tutorial

The key to using wrapping paper for the ornament’s center image is to use spray adhesive (I used Scott’s brand.) to attach the wrapping paper piece to thicker material for backing.  As you can see in the photo above, I used brown heavy-duty craft paper. It’s actually the center of a used up roll of wrapping paper.

Disney Frozen Anna Hand Made Ornament


 Adorable- right?  My three year old little girl loved the ornaments and I hope you did too!

Olaf and Anna ornaments


Disney Inspired Loom Creations

francesca profile photo

Today I’m excited to share with you Francesca’s Disney-Inspired Summer Boredom Blaster Loom projects!

A few weeks ago, while waiting to pick up my son, Gavin from a summer Art class , I noticed a really cool Disney Princess-Inspired charm that was dangling off of a women’s purse.  Of course, I had to ask the woman where she purchased the charm.  Instead of telling me where she purchased the charm, she introduced me to a nine-year-old little girl that happened to be in the same Art class as my son.  This adorable little artist’s name is Francesca.

Francesca received a Rainbow Loom from Santa this past Christmas.  By the spring, she began making Disney-inspired loom charms by following YouTube video tutorials.  With the knowledge she gained from the tutorials she went on to create Disney Princess inspired charms that she couldn’t find the tutorials for making.

Take a look at some of Francesca’s Loom charms!

Tinker Bell

tinkerbell charm

Jasmine

jasmine charm

Mulan

mulan charm

Pretty awesome, right?

Depending on the style of the charm, it takes Francesca between 30 to 40 minutes to complete a charm.  What a perfect summer boredom buster!

My son jumped on the Rainbow Loom bandwagon this summer and has had a great time making bracelets.  After seeing Francesca’s charms, we instantly went home to look up the YouTube tutorials.  Let me warn you, it took us a LOT longer to try and make a much simpler charm and part of it fell apart.  Although Francesca aspires to be a Paleontologist or a Dancer when she grows up, Gavin and I agree she’s an outstanding artist already!

While searching for Loom charm tutorials I came across this tutorial to create an adorable Olaf Inspired Loom Charm.  He’s on our list to attempt to create!

I’d like to thank Francesca for allowing me to share her summer boredom blaster projects on the blog today!  She’s one creative little Mouseketeer!

Did your children create any Disney-Inspired Loom projects?  I’d love for you to share them with us in the comments below!


Back-to-School with an Olaf Inspired Pencil Holder

Frozen Blog Hop

The sun is shining.  The birds are tweeting and my kids have been running round singing Olaf’s “In Summer” during this beautiful season we’ve been enjoying in Pennsylvania.

They’re not alone.  While talking with a bunch of fellow Disney-Inspired bloggers, we all realized that Frozen is just as hot as the blazing sun outside.  We decided to group together to bring you our best Frozen Inspired fun for you to read, pin and share as you hop around our blogs.

For my post today, I’d like to share with you how to make an Olaf-Inspired Pencil Holder.

Olaf Pencil Holder

Due to all the extra snow days we had last year, the district is trying to prepare for this winter by starting the school year earlier.  Trying to get my son prepared, I have school on the brain.  While picking up supplies the other day, I bought McDonald’s happy meals for the kids’ lunches.  With the Frozen soundtrack blaring in the background, I handed Gavin and Victoria their milks and couldn’t help but think of little Olaf’s adorably shaped head.  Pairing school with Olaf, I came up with an Olaf Inspired Pencil Holder!  My mind works in strange ways, I know.

Supplies

Olaf Pencil Holder Supplies

  • One cleaned McDonald’s milk container
  • Orange, white, black and brown felt
  • Two google eyes
  • Glue Gun with glue

Draw Olaf’s nose, eyebrows, mouth and tooth onto the felt and cut them out.

Olaf felt pieces

Hot glue the back of each piece and attach them to the milk bottle.

You’re done!  It’s that simple!

Can’t get enough of Olaf?  Hop on over to another fun Frozen post!